Buy Button Component
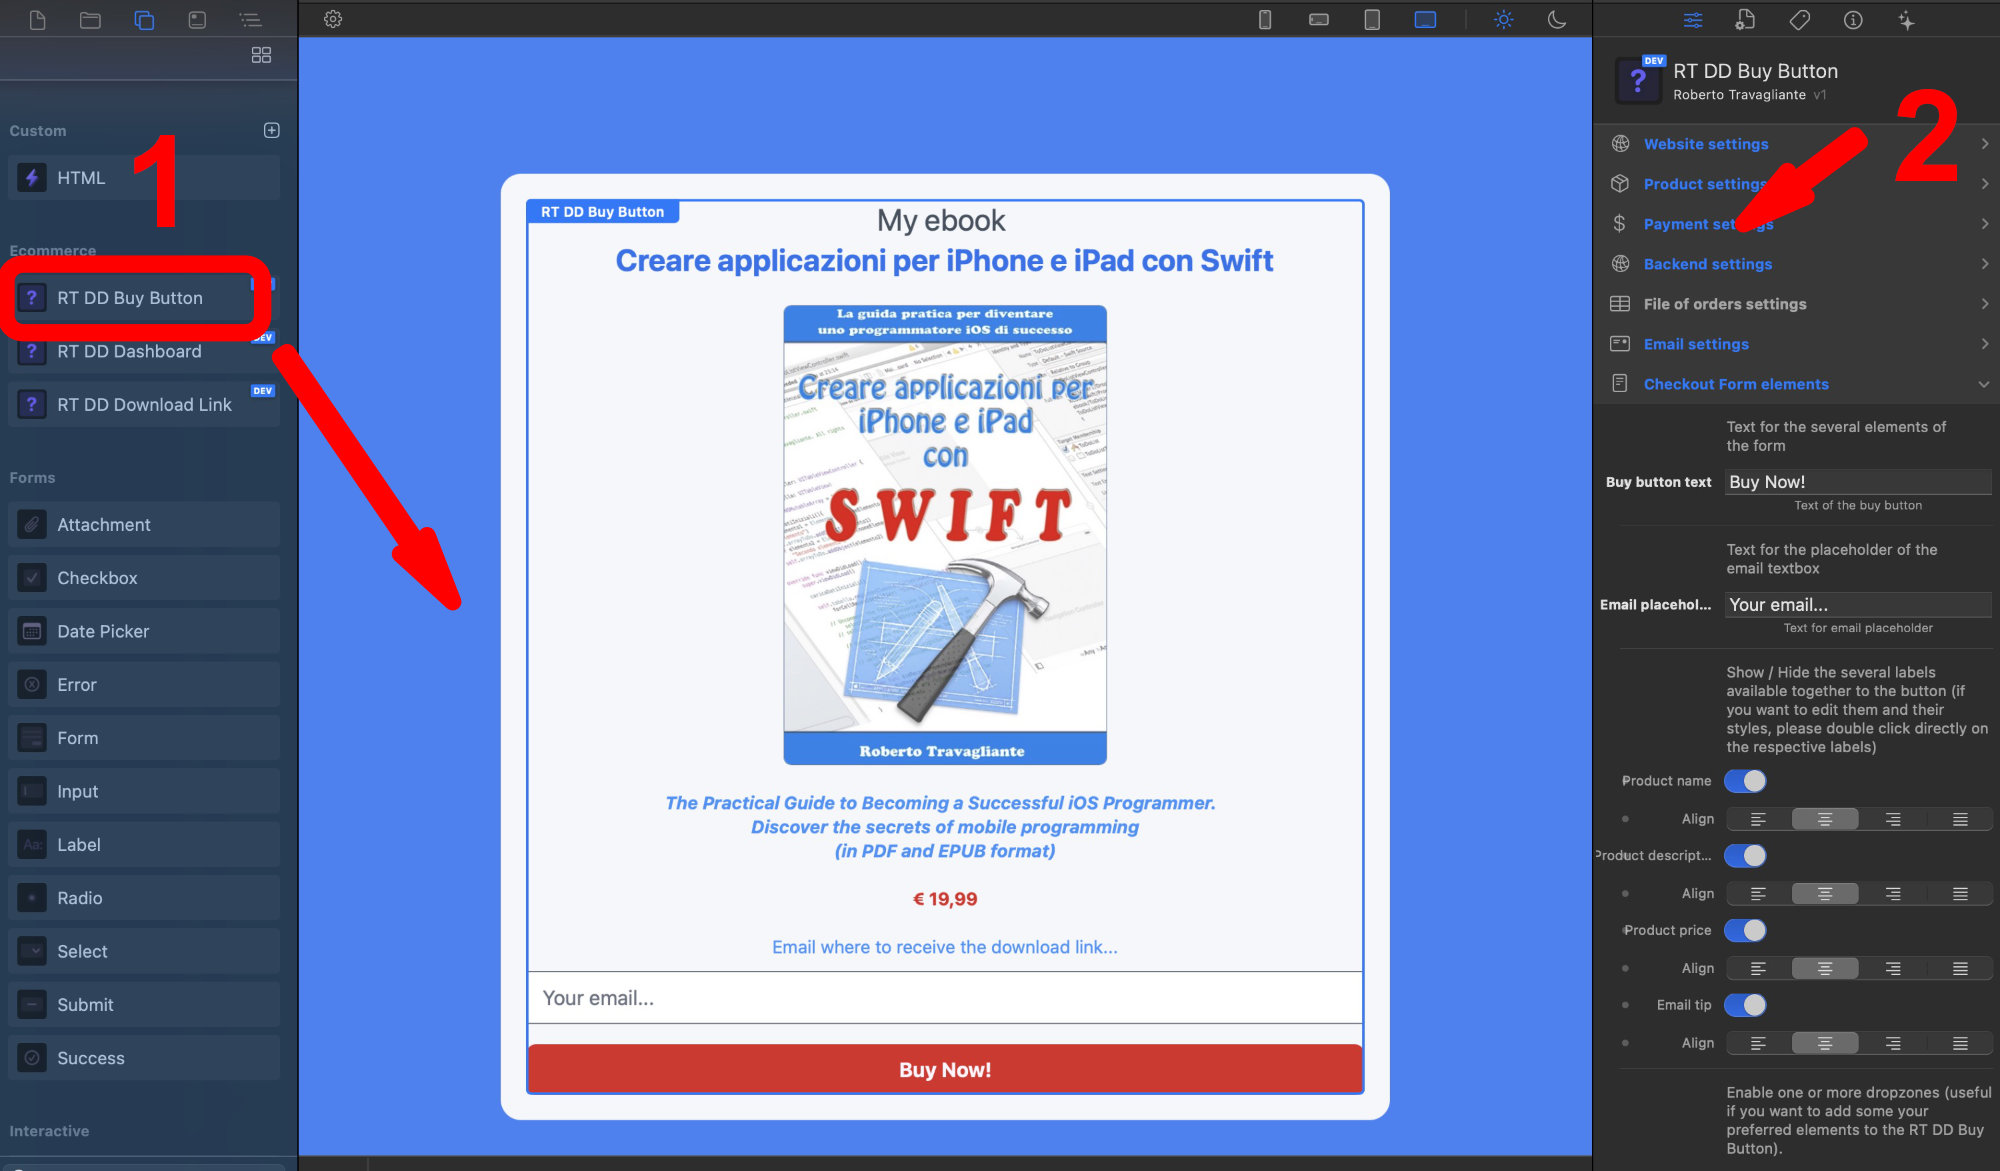
The Buy Button component handles the presentation layer and payment initiation. When dragged into your canvas inside RapidWeaver Elements, it renders a customizable payment acquisition form and dispatches asynchronous requests natively to prevent page interruptions.
How to Implement
Place the component where you want the user to execute an order, typically on the product page. The frontend javascript reads dynamic information from the server using api_info.php on loading, ensuring that prices and names match your backend parameters, keeping the user interface bulletproof against visual pricing tamper attempts.
Here are the steps:
- Drag the RT DD Buy Button element to your page, (better into a container)
- Set the several properties using the Inspector of Elements
The Buy Button is fully customizable in appearance using the standard Elements styling tools, but its true power lies in its logic.
Properties & Configurations
Configure the following settings in the Inspector to connect the button to your product and payment gateways:
Disclaimer Settings
Transparency is key to building trust with your customers. Whether you need to link to your Terms of Service, a Refund Policy, or GDPR compliance information, the Disclaimer Settings allow you to easily integrate legal text directly into the checkout flow without cluttering your page layout.
Show disclaimer: Switch toggle A master toggle switch (enabled by default). When activated, it automatically generates and displays a short, unobtrusive disclaimer text area directly beneath your Buy Button component. If you do not require a disclaimer for your digital products, simply toggle this off to hide the element completely.
Disclaimer link: Text field If the disclaimer is enabled, this text field allows you to route the user to your full legal policy. Simply paste the absolute URL of your terms page (e.g., https://www.yourwebsite.com/terms.html). By default, it points to a standard placeholder guide, but you should update this to reflect your own legal documentation.
Website Settings
This section defines the fundamental routing and directory parameters for your storefront.
Base URL: Text field The absolute web address where your shop is hosted (e.g., https://www.yourwebsite.com/shop-area/). The system uses this to construct functional links for emails and secure downloads.
Base Path: Text field The physical directory path on your actual server hardware (e.g., /var/www/html/shop-area/). If you leave this field blank, the application is smart enough to auto-detect it using the standard $_SERVER['DOCUMENT_ROOT'] variable.
Product Settings
Here, you configure the details of the specific digital item being sold.
Product name: Text field The customer-facing title of your digital good (e.g., "My product name").
Product price: Number The numerical cost of the item (e.g., "19,99").
Currency: Select dropdown A dropdown menu allowing you to select the billing currency, currently offering EUR or USD.
Real file: Text field The relative file path to the actual asset you are selling (e.g., /secret_files/product.pdf). This must perfectly match where you uploaded the file on your server, as the script will append it to your Base URL to pull the download. NOTE: If you are using a file that you previously placed in RapidWeaver Elements resources, please note that RapidWeaver Elements transforms the file name using lowercase letters only, so change the value of this property accordingly.
Link validity: Number A numeric field that defines the lifespan of the generated download link in hours (default is 24). If set to 0, the link will remain active indefinitely.
Payment Settings
This group manages the financial transaction pipelines and connects your storefront to external payment processors.
Gateway Type: Select dropdown A primary selector determining how payments are handled. You can choose a "Test gateway" (for local debugging without real money), "Stripe", or "PayPal".
Stripe secret: Text field Only active if Stripe is selected. This is where you paste your main API secret key (which begins with sk_test_ or sk_live_).
Stripe webhook: Text field Only active if Stripe is selected. This is the signing secret (beginning with whsec_) required to securely authenticate asynchronous communication from Stripe to your server.
PayPal account: Select dropdown Only used if PayPal is selected. A dropdown to switch between a "Sandbox" (test) or "Live" (production) environment.
Paypal email: Text field Only used if PayPal is selected. This must be the exact business email address tied to your PayPal merchant account.
Backend Settings
This handles page redirects after a user attempts a transaction.
Success page: Text field The relative URL route (e.g., /success.html) where customers are sent immediately after a successful payment. Note: This is usually where you place your "Download Button" component.
Cancel page: Text field The relative URL route (e.g., /cancel.html) where users are redirected if they abandon the checkout process.
File of Orders Settings
These properties manage the localized JSON database where all the transactions are securely saved.
Secret file name: Text field The name of the internal JSON file (default: completed_orders). It is highly recommended to change this to something obscure so malicious users cannot easily guess the database URL.
Enable Absolute Path: Switch toggle If turned on, it overrides the default relative storage location with the absolute path specified as following.
Absolute path: Text field If the toggle above is enabled, you must specify the exact physical local path where the orders file will be read and written (e.g., /var/www/html/).
Email Settings
This extensive section dictates how automated purchase receipts and backup download links are delivered.
Enable mail: Switch toggle A master toggle switch. If turned on, confirmation emails are sent after payments are successfully completed. If turned off, no emails are dispatched by the system.
Subject: Text field The subject line of the confirmation email. You can use dynamic tags like --PRODUCT_NAME-- (or others) here.
Mail Template: Select dropdown A dropdown featuring 10 pre-designed HTML email templates (Modern, Dark, Corporate, etc.), plus an option to use a "Custom Template".
Custom template: File If "Custom Template" is selected above, this resource field allows you to upload or link your own custom HTML file containing the required dynamic tags (--PRODUCT_LINK--, --PRODUCT_NAME--, --VALIDITY--).
Message: Text field The plain-text fallback body of the email. This ensures customers using legacy email clients that cannot render HTML will still safely receive their download link.
Mail method: Select dropdown A dropdown to choose between two server delivery protocols: PHPMailer (which uses a dedicated, authenticated external mail server and is highly recommended to avoid spam folders) or the native PHP mail() function (which requires zero setup but is less reliable).
Name of sender: Text field The alias that will appear in the customer's inbox (e.g., "Sales Office").
Email of sender: Text field The "From" address tied to the dispatching email.
Host: Text field (Requires PHPMailer) The address of your SMTP server (e.g., smtp.server.com).
Port number: Number (Requires PHPMailer) The communication port, typically 587 (TLS) or 465 (SSL).
Security: Select dropdown (Requires PHPMailer) A dropdown to select the encryption protocol (tls or ssl).
Username: Text field (Requires PHPMailer) Your SMTP login username, used during access to the mailbox that sends the confirmation emails.
Password: Text field (Requires PHPMailer) Your SMTP login password, used during access to the mailbox that sends the confirmation emails.
Checkout Form Elements
This group focuses entirely on the visual, front-end presentation of the checkout form.
Buy button text: Text field The label displayed directly on the primary call-to-action button (e.g., "Buy Now").
Email placeholder: Text field The ghost text inside the email input field before the user types anything (e.g., "Email address...").
Product name: Switch & Align Toggles the visibility of the product name label on the form, accompanied by an alignment control (Left, Center, Right, Justify).
Product description: Switch & Align Toggles the visibility of a descriptive text block, with its own alignment control.
Product price: Switch & Align Toggles the visibility of the price tag on the form, with alignment control.
Email tip: Switch & Align Toggles a helper text label near the email field, with alignment control.
Top dropzone: Switch toggle Toggles a dedicated area above the form where you can drag and drop additional custom web elements.
Middle 1 dropzone: Switch toggle Toggles a custom element dropzone in the middle of the form layout, between the product name and the description.
Middle 2 dropzone: Switch toggle Toggles a custom element dropzone in the middle of the form layout, between the description and the product price.
Middle 3 dropzone: Switch toggle Toggles a custom element dropzone in the middle of the form layout, after the product price.
Bottom dropzone: Switch toggle Toggles a custom element dropzone at the bottom of the form layout.
Buy Button Dropzone
Additional layout controls specifically for an adjacent dropzone area.
Dropzone: Segmented A segmented control to place a secondary dropzone relative to the main button (None, Left, or Right).
Spacing: Number If the dropzone is active, this controls the gap width (padding/margin) between the dropzone content and the button.
Global Styling Controls
These five sections utilize standardized UI "global controls" to handle the CSS aesthetics of the button component without requiring custom code.
Buy Button Font and Text Styles: Group of options Manages typography, weight, and text colors.
Buy Button Borders: Group of options Configures border radius (rounded corners), thickness, and colors.
Buy Button Spacing: Group of options Adjusts internal padding and external margins.
Buy Button Sizing: Group of options Controls the width and general scaling footprint of the button container.
Buy Button Background: Group of options Determines the fill colors, gradients, or solid backgrounds of the button element.
Debug Settings
This property section is used purely for diagnostics.
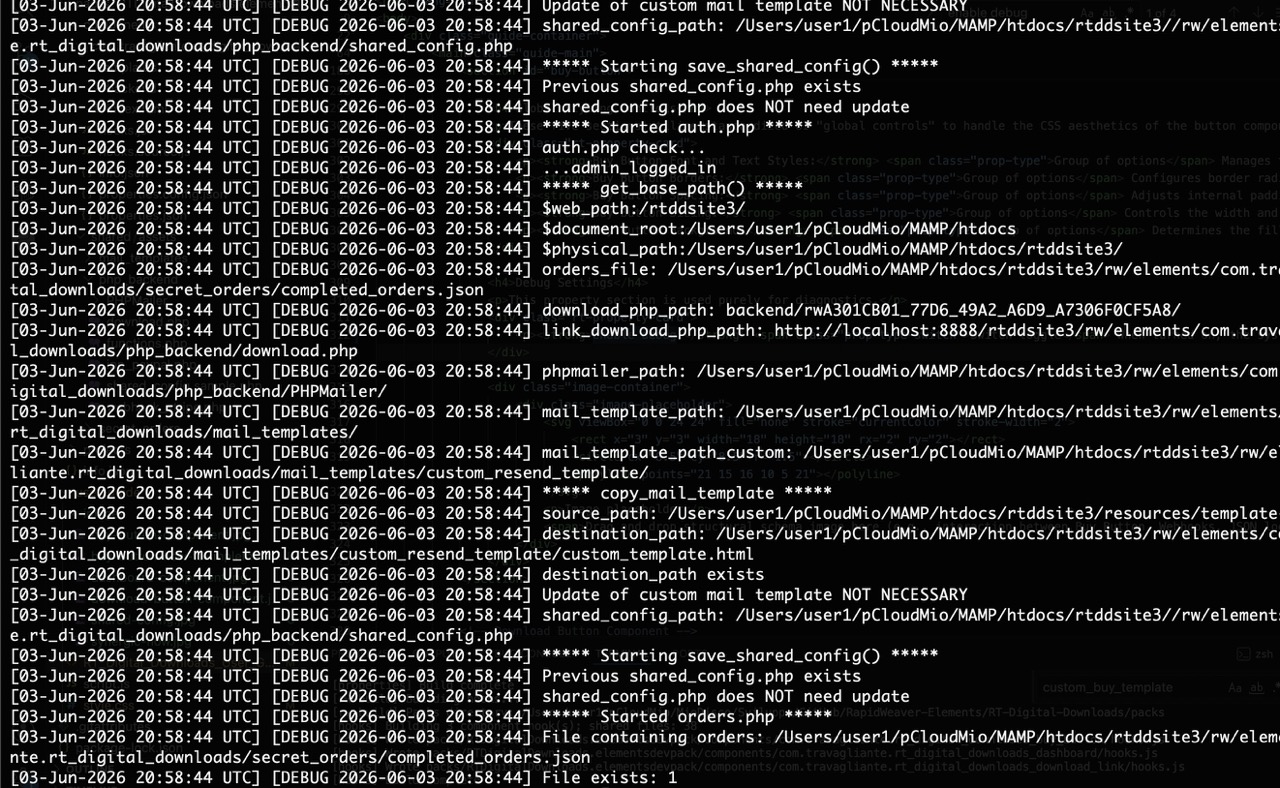
Enable debug: Switch toggle When turned on, the system actively logs server-side behaviors, webhook payloads, and configuration errors, making it much easier to troubleshoot issues during your initial setup. It should be disabled on production system, after the initial setup. After enabled, check the log files on the web server (for example on a Mac with MAMP installation of Apache server: tail -n 30 -f /Applications/MAMP/logs/php_error.log).
Download Button Component
The Download Button component is the gateway to fulfillment. It must be located on the page configured within your gateway profiles as the success destination (e.g., /success.html).
The Secure Polling Mechanism
Because webhooks from Stripe and PayPal process asynchronously (the user might be redirected back to your shop split-seconds before the payment processor's server sends confirmation to your webhook endpoint), the download button implements a smart polling technique. It prevents frustration by automatically showing a loading indicator and executing an HTTP query loop to api_check_order.php every 3 seconds up to a total of 12 times (36 seconds window).
How to Implement
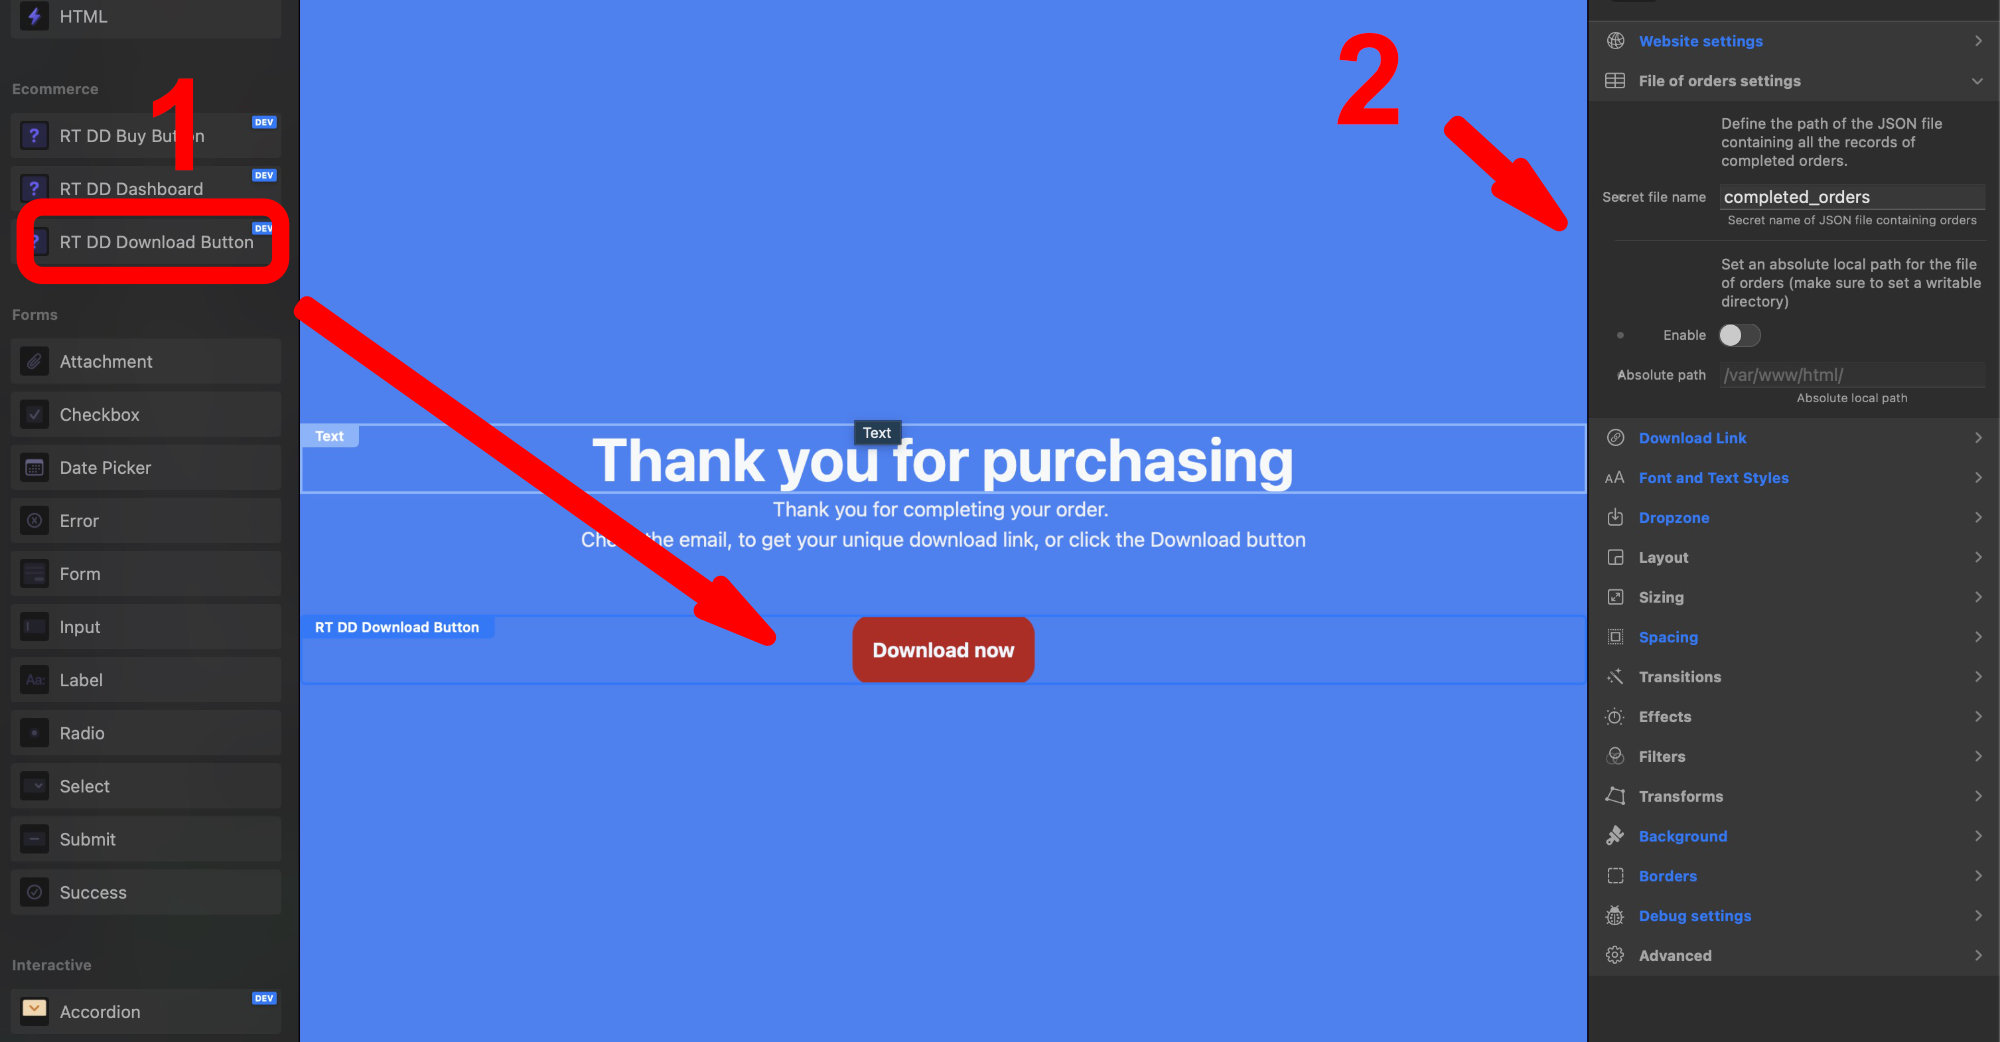
Place the component where the download link should appear, after the user completes the payment. Typically the success page.
Do the following to implement the download button on your success page:
- Drag and drop the RT DD Download Button component on your success page
- Set the several properties of RT DD Download Button
The Download Button is fully customizable in appearance using the standard Elements styling tools.
Properties & Configurations
Here is a detailed, step-by-step breakdown of every property in the Download Button component. The properties are explained in the exact order they appear, grouped by their respective sections.
Disclaimer Settings
Transparency is key to building trust with your customers. Whether you need to link to your Terms of Service, a Refund Policy, or GDPR compliance information, the Disclaimer Settings allow you to easily integrate legal text directly into the checkout flow without cluttering your page layout.
Show disclaimer: Switch toggle A master toggle switch (enabled by default). When activated, it automatically generates and displays a short, unobtrusive disclaimer text area directly beneath your Buy Button component. If you do not require a disclaimer for your digital products, simply toggle this off to hide the element completely.
Disclaimer link: Text field If the disclaimer is enabled, this text field allows you to route the user to your full legal policy. Simply paste the absolute URL of your terms page (e.g., https://www.yourwebsite.com/terms.html). By default, it points to a standard placeholder guide, but you should update this to reflect your own legal documentation.
Website Settings
This section ensures the download component knows exactly where it lives on your server, which is essential for securely locating and serving the digital files.
Base URL: Text field The absolute web address of your storefront (e.g., https://www.yourwebsite.com/shop-area/). The component uses this to build the final, clickable download links for the customer.
Base Path: Text field The physical directory path on your actual server hardware (e.g., /var/www/html/shop-area/). If left blank, the system will automatically attempt to detect this using the server's $_SERVER['DOCUMENT_ROOT'] variable.
File of Orders Settings
This group points the download component to the same secure database created by the Buy Button, allowing it to verify if a payment was actually completed before releasing the file.
Secret file name: Text field The name of the internal JSON database file (default is completed_orders). It must perfectly match the name you configured in your Buy Button settings so the two components can "talk" to each other.
Enable Absolute Path: Switch toggle Activating this allows you to override the default relative path and place your database in a highly secure, custom location on the server.
Absolute path: Text field If the toggle above is enabled, you must provide the exact local server path (e.g., /var/www/html/) where the JSON file is stored.
Download Link
These settings control the text and the visual interface states of the download button itself.
Download text: Text field The actual text displayed on the button once the payment is verified and the file is ready to be downloaded (e.g., "DOWNLOAD LINK").
Waiting message (preview): Switch toggle A toggle switch to show or hide the "waiting" state preview in your RapidWeaver Elements workspace. This helps you design what the user sees while the component is actively polling the server for payment confirmation.
Thank you message (preview): Switch toggle A toggle switch to show or hide the "success" state preview within your workspace, allowing you to style the final confirmation layout.
Error messages (preview): Switch toggle A toggle switch to preview the "error" state layout, so you can style what the user sees if the transaction times out or fails.
Global Styling Controls
The remaining sections activate standardized RapidWeaver Elements styling panels. These "Global Controls" allow you to design the complete visual aesthetic of the Download Button seamlessly:
Layout: Group of options Manages flexbox/grid alignments and the internal structure of the button.
Sizing: Group of options Controls the width, height, and overall footprint of the button.
Spacing: Group of options Adjusts the internal padding and external margins.
Transitions: Group of options Allows you to set smooth animation timings (e.g., how fast the button changes color on hover).
Effects: Group of options Configures visual enhancements like box shadows or opacity.
Filters: Group of options Applies CSS filters like blur, brightness, or contrast.
Transforms: Group of options Allows you to scale, rotate, or skew the element.
Background: Group of options Determines the background colors, gradients, or images behind the button.
Borders: Group of options Configures border thickness, style, color, and rounded corners (border-radius).
Debug Settings
This section is purely for troubleshooting during your setup phase.
Enable debug: Switch toggle When turned on, it enables server-side tracing. If a download fails to trigger, this will write the errors to your server's log file, helping you identify configuration or permission issues.
Order Dashboard Component
The Order Dashboard is the administrative heart of the RT Digital Downloads suite. Rather than relying on external third-party platforms or complex SQL database queries, this component generates a standalone, highly secure web application directly within your server environment. It is designed to give you (or your clients) total control over the digital storefront, from tracking revenue to resolving customer support tickets in real-time.
Because the Dashboard automatically reads the shared_config.php file generated by your Buy Button component, it doesn't requires much additional configuration. Once published, it instantly knows where your hidden JSON database is located, what your mail server settings are, and which passwords are required for access.
The Two-Tier Authentication System
Security is paramount when dealing with customer data and transaction records. The dashboard implements a strict, session-based authentication gateway with two distinct user roles, configurable directly from the RapidWeaver Elements inspector:
- Administrator Mode: Unlocks the full potential of the dashboard. Administrators can view all data, manually inject new orders, revoke download tokens, resend emails, and execute server diagnostic scripts. This role is protected by the Admin Password.
- Read-Only Mode: A highly restricted view designed for virtual assistants, client monitoring, or external accountants. Users logged in with the Read-Only Password can view charts, track sales, and read transaction details, but the system strictly blocks all POST modification requests. They cannot alter data, generate links, or change server states, ensuring absolute data integrity.
Visual Analytics and Reporting
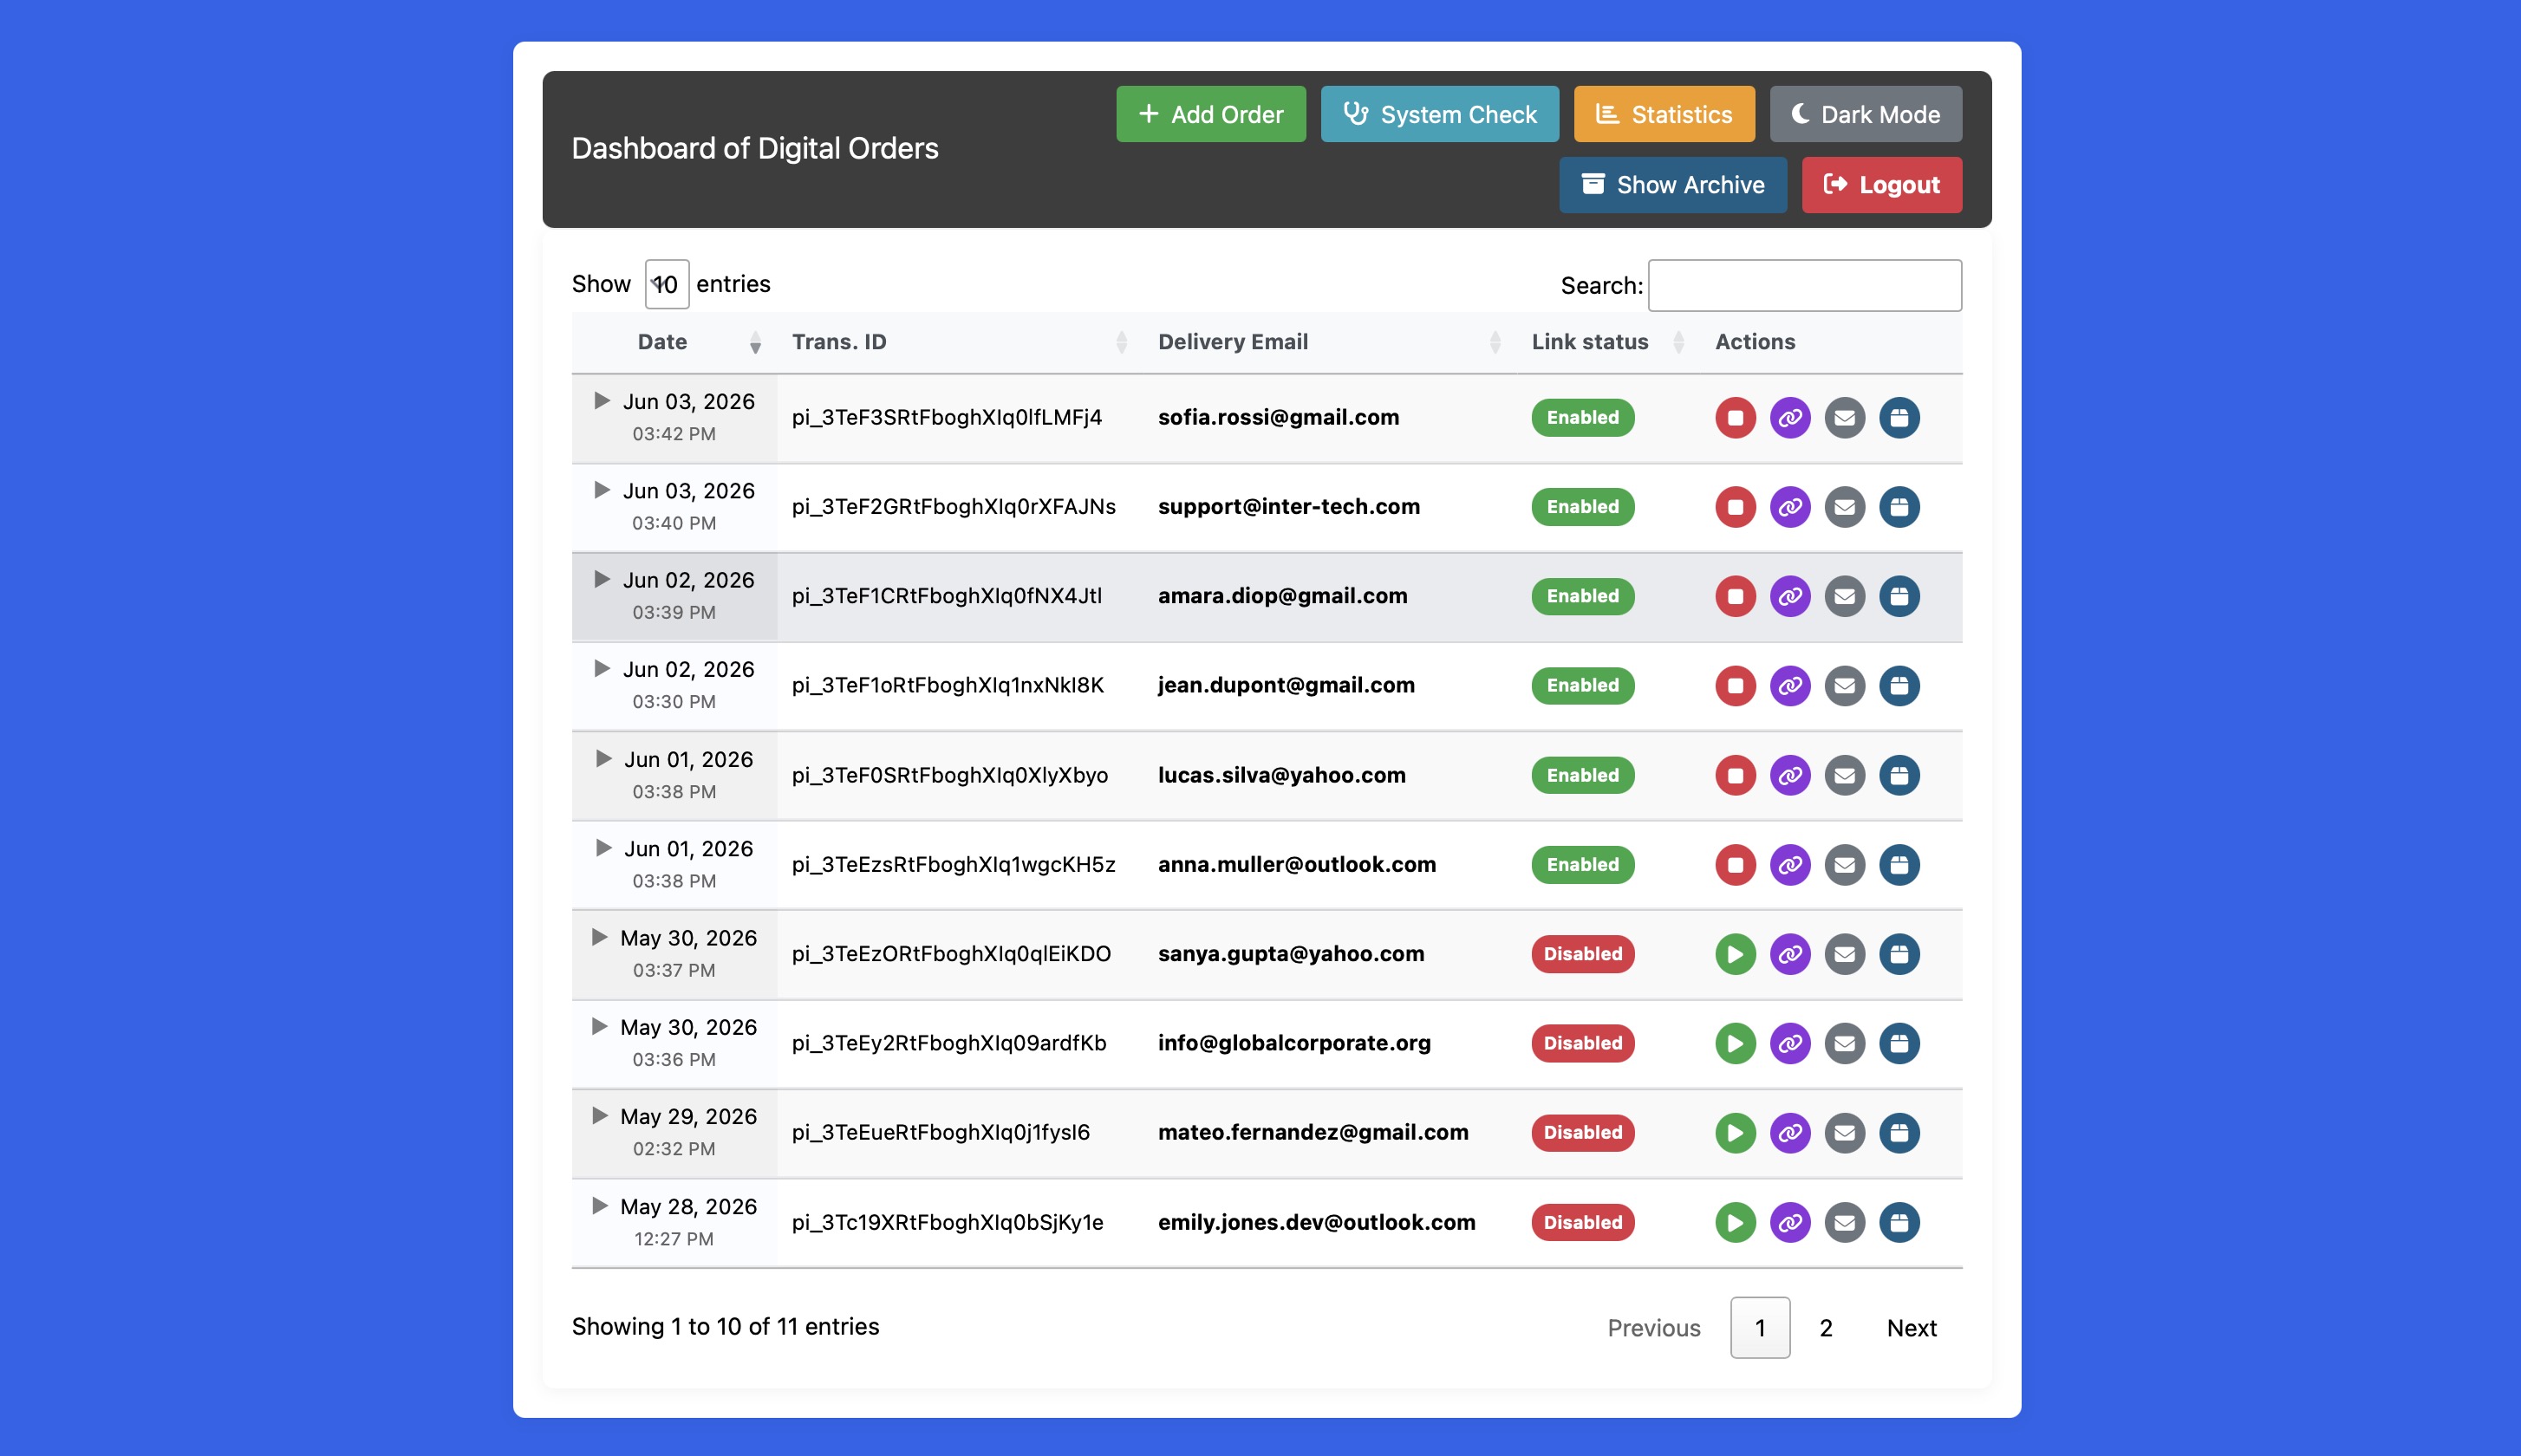
Upon logging in, the dashboard presents a clean, responsive interface featuring dynamic data visualization powered by Chart.js.
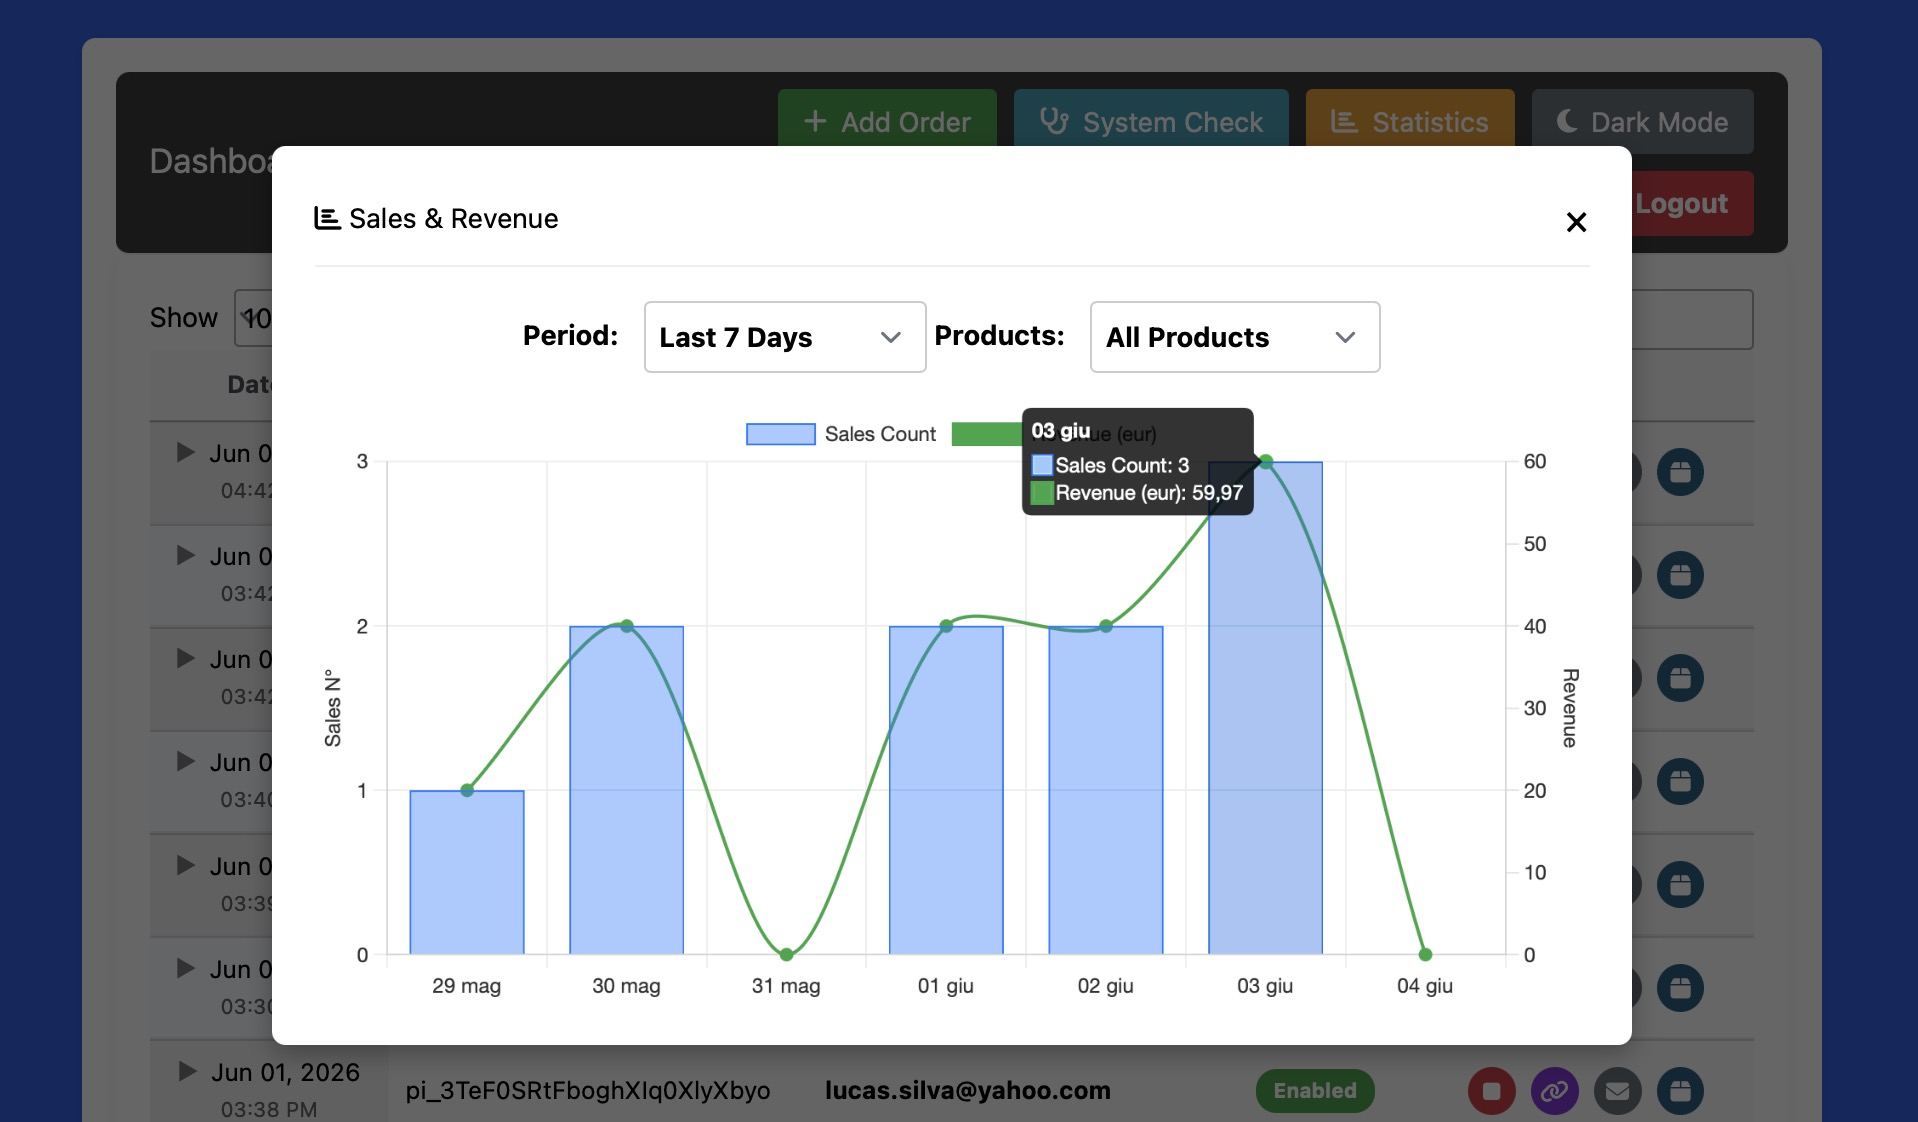
Instead of staring at raw JSON text, the system automatically parses your transaction history and translates it into actionable metrics. You can instantly track gross revenue, monitor sales volume trends over time, and identify your best-performing days. The grid layout adapts seamlessly to mobile devices, allowing you to check your shop's performance on the go.
Complete Order Lifecycle Management
The dashboard goes far beyond simple reporting; it provides the tools necessary to provide excellent customer support. From the administrative grid, you can manage the entire lifecycle of an order:
- Deep Dive Transaction Details: Click on any order to view its exact timestamp, the assigned cryptographic transaction token, the buyer's email address, and the precise payment gateway used (Stripe or PayPal).
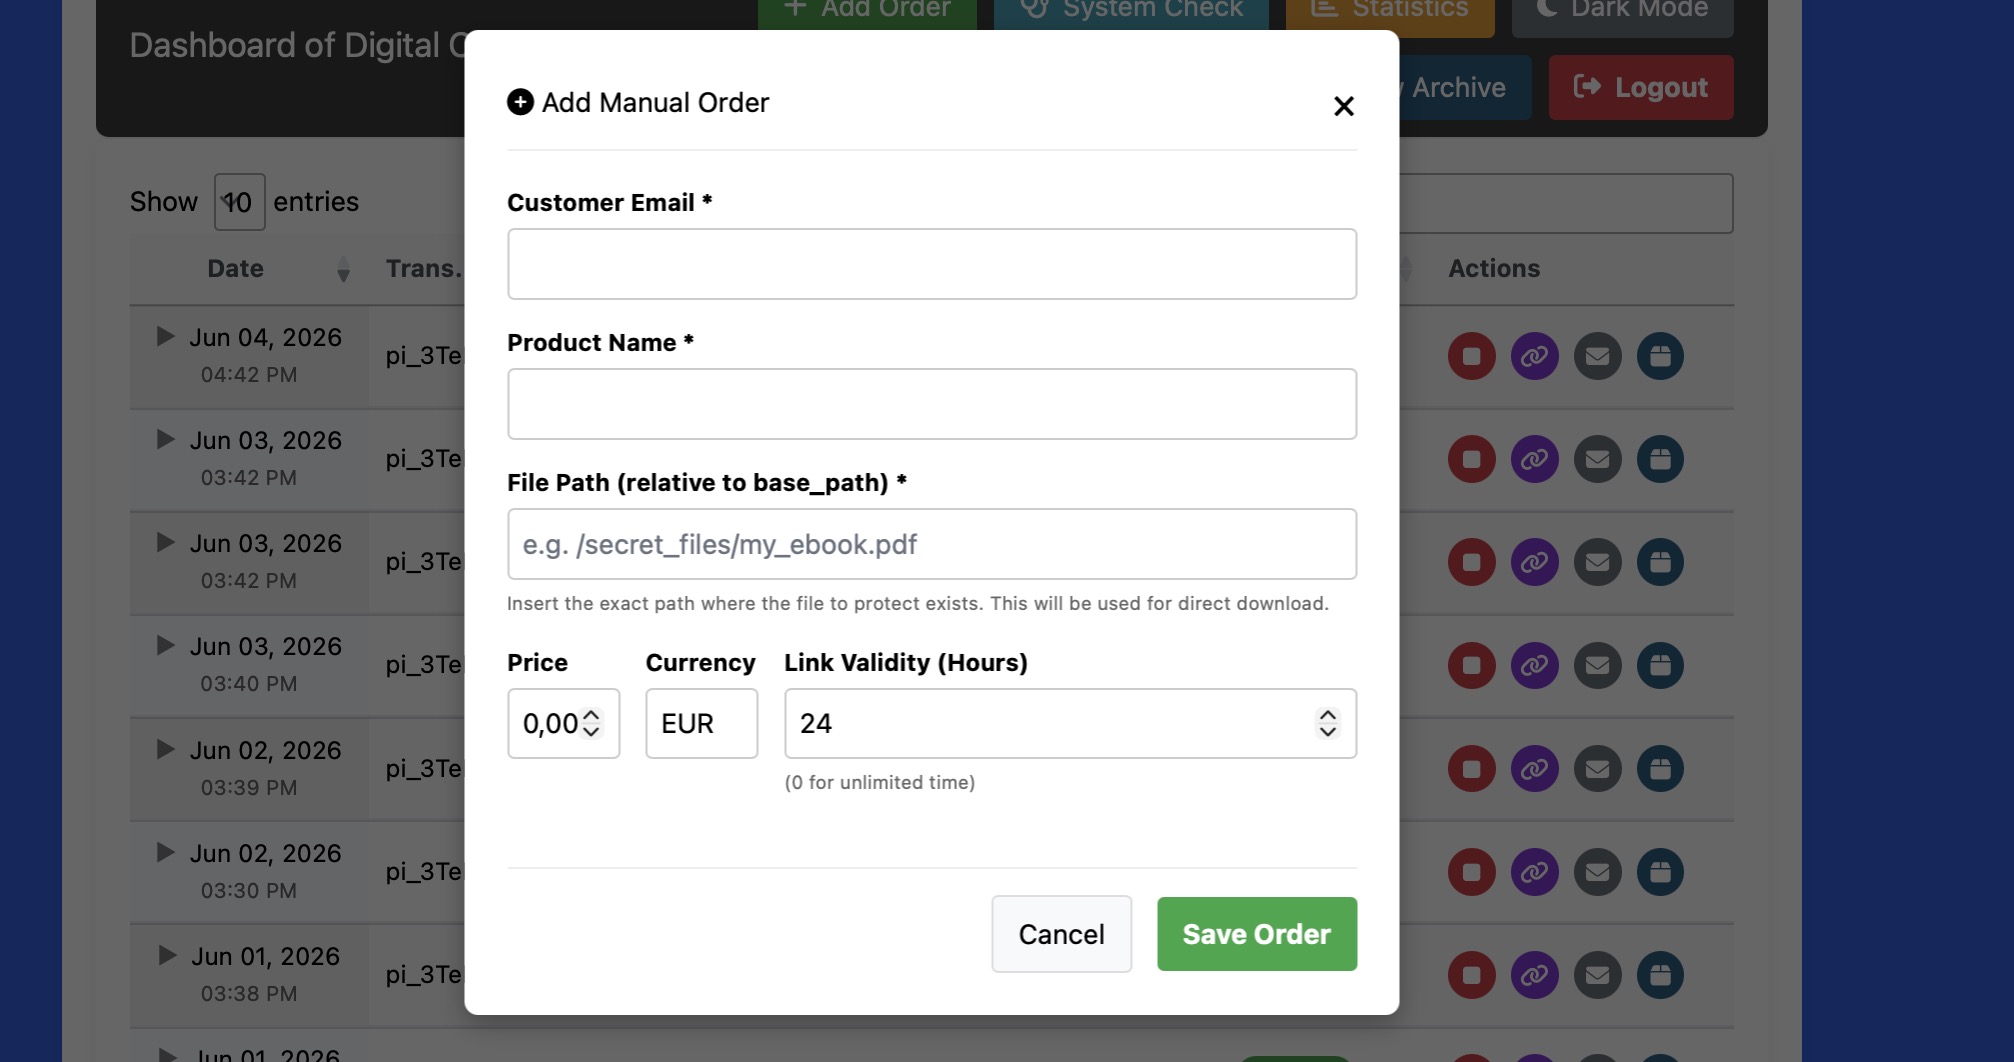
- Manual Order Overrides: If a customer pays via an alternative method (like a direct bank wire or even cash), an Administrator can manually enter their details into the system. The dashboard will instantly generate a secure, tokenized download link and log it into the database just like a standard automated transaction.
- Real-Time Email Re-delivery: If a customer accidentally deletes their receipt or their email provider blocks the initial automated message, you can trigger a manual re-delivery of the confirmation email—complete with their valid download link—with a single click.
- Link Revocation & Extension: You maintain total control over your intellectual property. If a link expires before a customer can download their file, or if you suspect a link has been shared maliciously, you can manually intervene to extend the link's validity or instantly revoke access.
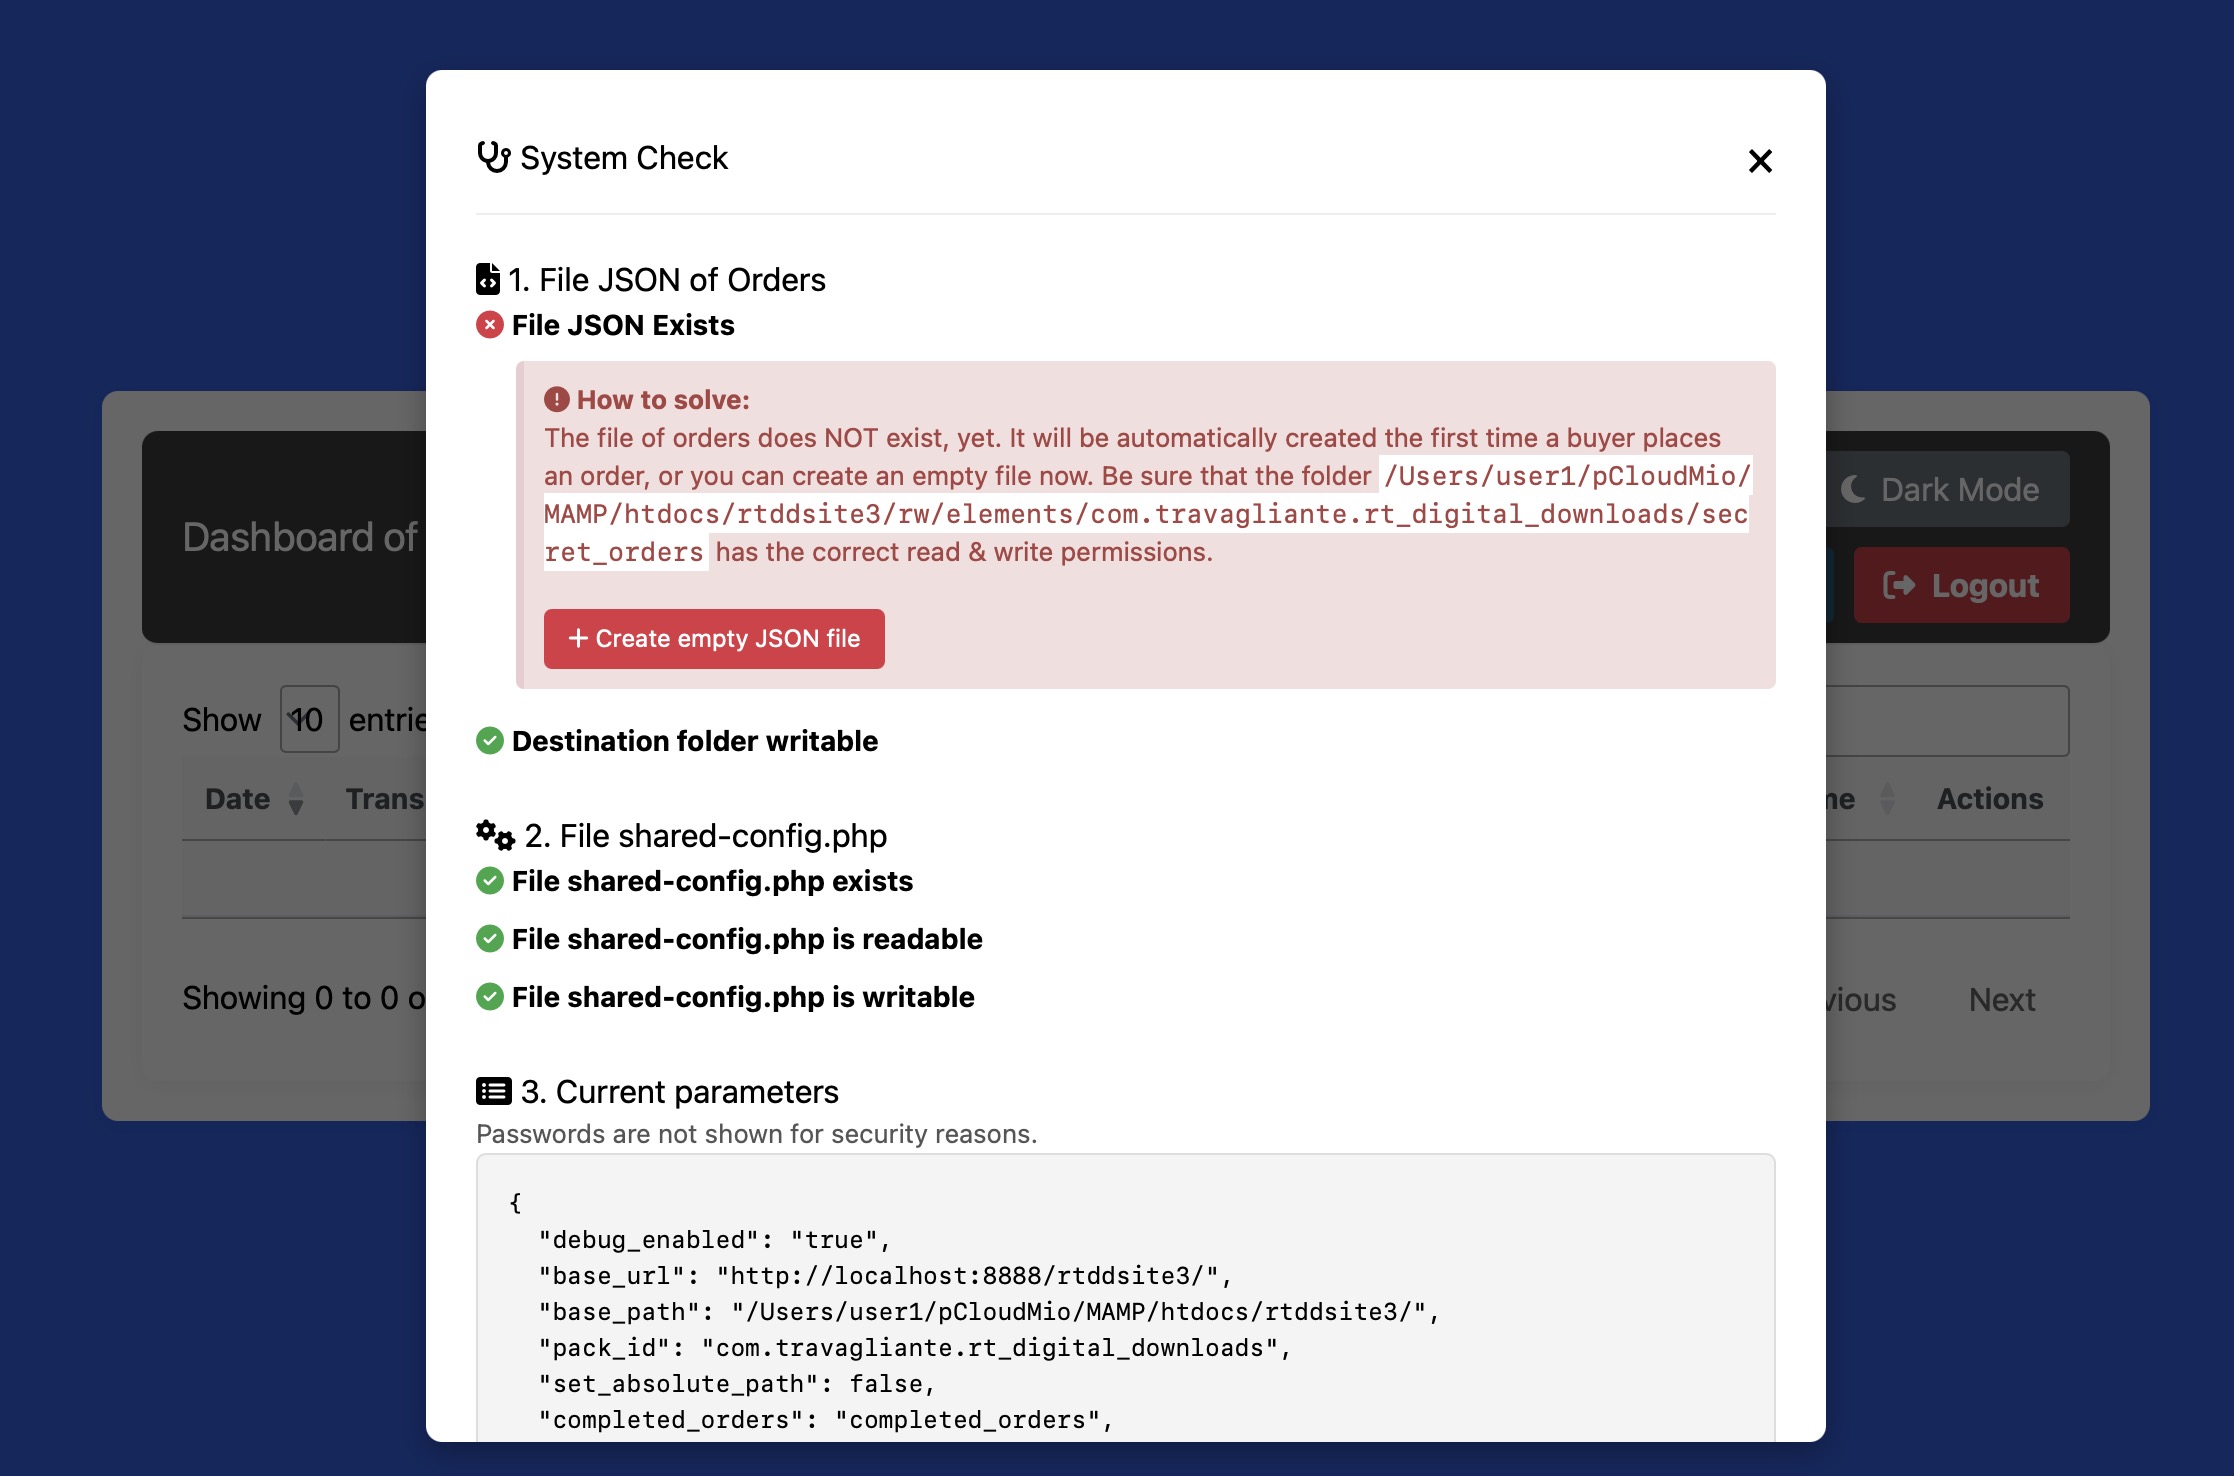
The Automated Diagnostics & Self-Healing Engine
Hosting environments can be unpredictable. Server updates, aggressive security plugins, or accidental file deletions can break PHP applications. To mitigate this, the dashboard features a built-in System Check utility—a self-healing diagnostic engine. When executed, the system runs a deep architectural audit:
- Repository Audit: It checks if the hidden JSON database file exists and validates if the server has the correct read/write permissions (CHMOD status) to access it.
- Configuration Integrity: It verifies that the shared_config.php file is perfectly synchronized with the active components.
- One-Click Recovery: If the diagnostic tool detects a missing file or a permission blockade, it doesn't just show an error code. It exposes automated recovery protocols, allowing the Administrator to rebuild missing files or forcefully correct folder permissions with a single click, completely bypassing the need to use an FTP client or cPanel.
Detailed Properties Configuration Breakdown
The core configuration options exposed inside the RapidWeaver Elements Inspector panel are mapped below. Every field dictates structural parameters handled inside the unified config.php and compiled into shared_config.php.
Properties & Configurations
Here is a detailed, step-by-step breakdown of the properties which configures the Order Dashboard component. Just like the previous components, these settings ensure the dashboard perfectly synchronizes with the rest of your storefront ecosystem.
Disclaimer Settings
Transparency is key to building trust with your customers. Whether you need to link to your Terms of Service, a Refund Policy, or GDPR compliance information, the Disclaimer Settings allow you to easily integrate legal text directly into the checkout flow without cluttering your page layout.
Show disclaimer: Switch toggle A master toggle switch (enabled by default). When activated, it automatically generates and displays a short, unobtrusive disclaimer text area directly beneath your Buy Button component. If you do not require a disclaimer for your digital products, simply toggle this off to hide the element completely.
Disclaimer link: Text field If the disclaimer is enabled, this text field allows you to route the user to your full legal policy. Simply paste the absolute URL of your terms page (e.g., https://www.yourwebsite.com/terms.html). By default, it points to a standard placeholder guide, but you should update this to reflect your own legal documentation.
Website Settings
These properties define the foundational paths so the dashboard knows exactly where it is hosted and where to look for interconnected files.
Base URL: Text field The absolute web address where your shop is hosted (e.g., https://www.yourwebsite.com/shop-area/). The dashboard uses this to correctly render links and generate manual download tokens if needed.
Base Path: Text field The physical directory path on your actual server hardware (e.g., /var/www/html/shop-area/). Leaving it blank allows the dashboard to auto-detect the path using $_SERVER['DOCUMENT_ROOT'] variable.
File Containing Orders
The dashboard’s primary job is to read and manage your transaction database. These settings ensure it connects to the exact same file created by your Buy Button.
Secret file name: Text field The name of your internal JSON database (default is completed_orders). This must perfectly match the name you set in the Buy Button component.
Enable Absolute Path: Switch toggle If turned on, it overrides the default relative storage location with the absolute path specified as following.
Absolute path: Text field If the toggle above is on, you must specify the exact local server directory (e.g., /var/www/html/) where the JSON file resides. Ensure the server has read/write permissions for this directory.
Passwords for Dashboard
This section controls the two-tier security authentication system to prevent unauthorized access to your sales data.
Admin password: Text field The master password (default: Password1) that grants full access. Users logging in with this password can view charts, execute manual order entries, revoke links, and run server diagnostics.
Read only password: Text field A secondary, restricted password (default: Password2). This is ideal for external staff or accountants. It allows them to view sales charts and read transaction logs, but absolutely prevents them from making any modifications to the system.
Email Settings
The dashboard includes a powerful feature that allows administrators to manually resend confirmation emails and download links to customers. This section perfectly mirrors the Buy Button email configuration to ensure consistency.
Enable mail: Switch toggle A master toggle switch. If turned on, you activate the dashboard's ability to dispatch emails.
Subject: Text field The subject line of the re-sent confirmation emails. You can use dynamic tags like --PRODUCT_NAME-- (or others) here.
Mail Template: Select dropdown A dropdown selector containing 10 pre-designed HTML email layouts (Modern, Dark, Corporate, Neon, etc.), plus an option to choose a "Custom Template".
Custom template: File If "Custom Template" is selected above, this resource field allows you to upload or link your own custom HTML file containing the required dynamic tags (--PRODUCT_LINK--, --PRODUCT_NAME--, --VALIDITY--).
Message: Text field The plain-text fallback version of the email, ensuring delivery to customers using legacy email clients that strip out HTML formatting.
Mail method: Select dropdown Determines the delivery method. Choose PHPMailer (highly recommended for reliable, authenticated delivery) or the native PHP mail() function (requires no setup but is more prone to spam filters).
Name of sender: Text field The alias that appears in the customer's inbox (e.g., "Sales Office").
Email of sender: Text field The "From" address tied to the dispatching email.
Host: Text field (Requires PHPMailer) The address of your SMTP server (e.g., smtp.server.com).
Port number: Number (Requires PHPMailer) The communication port, typically 587 (TLS) or 465 (SSL).
Security: Select dropdown (Requires PHPMailer) A dropdown to select the encryption protocol (tls or ssl).
Username: Text field (Requires PHPMailer) Your SMTP login username, used during access to the mailbox that sends the confirmation emails.
Password: Text field (Requires PHPMailer) Your SMTP login password, used during access to the mailbox that sends the confirmation emails.
Debug Settings
A crucial tool for administrators configuring the dashboard for the first time or troubleshooting server issues.
Enable debug: Switch toggle Activating this turns on the dashboard's internal logging capabilities, which can capture configuration mismatches, email delivery failures, or pathing errors to help you quickly diagnose server-side problems.